
Building Complex UI Solutions Using SwiftUI vs. UIKit
Two years ago, we got an innovative product initiative to implement a new workout screen in MySwimPro, the best swimming workout app for the iOS platform. We call it the SwimGauge™.
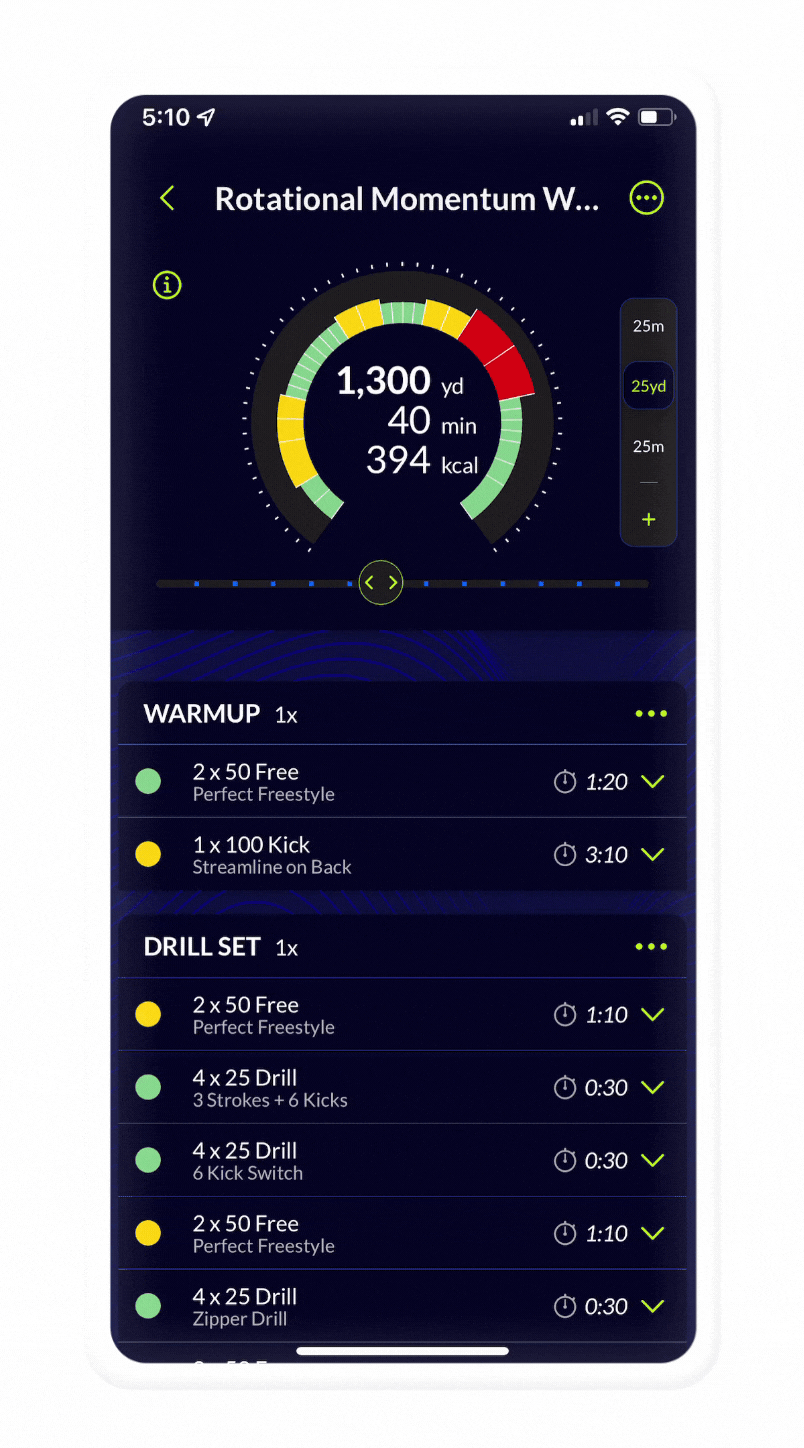
The MySwimPro SwimGauge provides a new, visual overview of workouts for MySwimPro members. It shows total distance, time, calories, laps, and Effort Levels for the entire swim. It also uses MySwimPro’s Dynamic Swim Algorithm, which quickly adjusts the workout structure for personal needs.
The goal was to create an amazing visual experience for members to personalize their workouts. You can find more information about the visual components we built here and personalizing MySwimPro workouts here.

This article will open the door a little bit to what was going on under the hood from an engineering perspective. Hopefully, it will help someone make better decisions when building complex UI solutions using SwiftUI versus UIKit.
SwiftUI was first released in 2019, introducing a powerful new way to build user interfaces in a declarative, state-driven style. It was a radical shift in Apple’s platforms, and everyone was excited about that.
SwiftUI was created for cross-platform use to build applications with less code than UIKit, but with the same complexity. The technology was raw compared to UIKit: many constraints with SwiftUI prevented us from doing many things that were possible or even easy in UIKit. On the other hand, the new framework allowed us to build and iterate custom UI components quickly. Because of the ability to quickly build and iterate, we decided to take a risk and go with SwiftUI. Spoiler! We didn’t regret it.
First Design
The first mockup looked like this:

The screen required the following main components:
- Navigation Bar with a title. Nothing custom. The left and right buttons with a menu.
- SwimGauge. A circle that represents the structure of the workout. It should be interactive. Sections of the circle are tappable and should be highlighted when selected.
- Slider that adjusts the distance of the Workout which changes the SwimGauge and workout structure instantly.
- Pool Selector to easily change pool size.
- Table with the structure of the workout. This table should support the drag and drop of items to support rearranging the sets (this turned out to be a sticking point later). The cells of the table should be expandable. Also, cells have context menus. The table is scrollable.

First Traps
SwiftUI List isn’t fully customizable for the OS versions we need to support. It’s not even possible to customize the background color of the content. The only way to work around this is to make changes via UITableView.appearance(). Today you can customize it, but only in iOS 16 code and later.
UITableView.appearance().separatorStyle = .noneUITableView.appearance().backgroundColor = .clearThere was no way to implement drag and drop in the table with pure SwiftUI because it did not support this functionality for iOS 13. We decided to go with UICollectionView. UICollectionView supports this built-in functionality with UICollectionViewDragDelegate and UICollectionViewDropDelegate. So there was no reason to reinvent the wheel.
This wasn’t as bad as it sounded, though, because Apple released contentConfiguration for UICollectionViewCell or UITableViewCell starting with iOS 14. This API allows you to build SwiftUI views inside cells super quickly. We still needed to support iOS 13 at that moment, so we had to make that on our own.
import UIKit
import SwiftUI

/// Subclass for embedding a SwiftUI View inside of UICollectionViewCell
open class SwiftUICollectionViewCell<Content>: UICollectionViewCell where Content: View {

    /// Controller to host the SwiftUI View
    public private(set) var host: UIHostingController<Content>?

    /// Resets the cell
    open override func prepareForReuse() {
        super.prepareForReuse()

        if let hostView = host?.view {
            hostView.removeFromSuperview()
        }
        host = nil
    }

    /// Embeds host controller to the hierarchy
    public func embed(in parent: UIViewController? = nil, withView content: Content) {
        if let host = host {
            host.rootView = content
            host.view.layoutIfNeeded()
        } else {
            let host = UIHostingController(rootView: content)
            if let parent = parent {
                parent.addChild(host)
                host.didMove(toParent: parent)
            }
            contentView.addSubview(host.view)
            host.view.backgroundColor = .clear
            contentView.backgroundColor = .clear
            self.host = host
        }
    }

    deinit {
        host?.willMove(toParent: nil)
        host?.view.removeFromSuperview()
        host?.removeFromParent()
        host = nil
    }
}
We love using SwiftUI views inside UIKit code, as it’s super portable and much easier to build custom UI for cells, and still allows us to use the power of the more mature UIKit framework.
The most challenging part of building the cells was to make them expandable. This is because the cell’s content is in SwiftUI, but UIKit controls the cell’s size. SwiftUI code never knows what the size of the cell is, which is required to make things like smooth animations work.
To work around this, we built two states of the view separately in the cell and made an expand/collapse function by re-rendering the table on tap. But I’d recommend implementing this using UIStackView in the UIKit code because UIStackView takes care of animations automatically. It handles all of the animations when the app hides or shows some parts of the stack. This approach gives you more flexibility to achieve smooth animations.
In summary, for the table we used UICollectionView with SwiftUI views embedded inside of UIStackView.
Performance
Overall, SwiftUI met our performance expectations. A complexity of this task was that users could adjust the distance and other parameters of the workout according to their personal needs and the app rebuilds the workout structure whenever the user drags the slider knob.

The architecture of the table was something like this:
- The SwiftUI view container
- That contains UICollectionView inside
- Connected through UIViewRepresentable
- Cells of the UIViewRepresentable are in SwiftUI

Does it sound ridiculous? Yes, it does.
The UI needed to update rapidly but the code path was long and potentially slow if users dragged the slider super fast.
How did we solve this problem? We used models for cells as ObservableObject that listened for updates to the underlying model using Bindable attributes. So, we only needed to implement a shallow update. The app doesn’t need to go through the UI hierarchy; the needed variable is updated and immediately goes to the cell’s model via the bindable properties. The one exception could be when rows are added or deleted, but our workout personalization algorithm doesn’t add or remove sets – it only modifies them – so this was out of scope for us.
Issues
We used UIHostingController as our main container, and there is a known defect that you can’t ignore safe areas from SwiftUI code. This can cause cells in the UICollectionView to blink at the bottom when the table’s content intersects the safe area.
There is a magic solution for that: We can listen for the safe area insets on the UIView and apply them to the SwiftUI view.
import UIKit
import SwiftUI

extension UIHostingController {

    convenience public init(rootView: Content, ignoreSafeArea: Bool) {
        self.init(rootView: rootView)

        if ignoreSafeArea {
            disableSafeArea()
        }
    }

    func disableSafeArea() {
        guard let viewClass = object_getClass(view) else {
            return
        }

        let viewSubclassName = String(cString: class_getName(viewClass)).appending("_IgnoreSafeArea")
        if let viewSubclass = NSClassFromString(viewSubclassName) {
            object_setClass(view, viewSubclass)
        } else {
            guard let viewClassNameUtf8 = (viewSubclassName as NSString).utf8String else {
                return
            }
            guard let viewSubclass = objc_allocateClassPair(viewClass, viewClassNameUtf8, 0) else {
                return
            }

            if let method = class_getInstanceMethod(UIView.self, #selector(getter: UIView.safeAreaInsets)) {
                let safeAreaInsets: @convention(block) (AnyObject) -> UIEdgeInsets = { _ in
                    return .zero
                }
                class_addMethod(viewSubclass, #selector(getter: UIView.safeAreaInsets), imp_implementationWithBlock(safeAreaInsets), method_getTypeEncoding(method))
            }

            objc_registerClassPair(viewSubclass)
            object_setClass(view, viewSubclass)
        }
    }
}
Check out this reference for an explanation of the solution.
If your project is mostly in UIKit and you are looking to add a new screen, I’d recommend creating a UIViewController and attaching SwiftUI inside this control versus just pushing UIHostingController into the stack. UIHostingController brings a bunch of issues, especially if you need to support older versions. For instance:
- If you use the navigation controller, there is no synchronization between UIKit and SwiftUI navigation stacks. You can get the double navigation bar.
- The navigation bar doesn’t have smooth animation; it twitches sharply sometimes.
- Animation glitches for navigation buttons.
Testing
After all these changes to the UI, we needed to write some tests to make sure the UI doesn’t change unexpectedly in the future. The best way we’ve found to test SwiftUI code is Snapshot Testing. You can test small components with different states, or you can test the whole screen at once. That depends on your project. Initially, this may seem quite frightening and flaky.
However, if you test small things and use the fuzzy threshold correctly, then it becomes helpful and easily maintainable. The hardest parts of snapshot testing are:
- Passing in decent dummy data, but if you are using Previews when building you are already in the habit of doing that. You can use Previews for quick development and make tests for that at the same time.
- CI(Continuous Integration) maintenance. It’s hard to figure out the cause on the remote machine if the screenshot is not matching for some reason.
A good example is to test small components. For instance, table cells. You test visual presentation and data at the same time. Here are some of our snapshot tests:

Conclusion
Building this complicated UI in SwiftUI was hard, but our code is much more flexible and portable now. Plus our customers love the new screen! It helped to get a visual experience working with workouts on a new level and brought a lot of value for members.
We don’t regret using SwiftUI code in an entirely UIKit project. That was bumpy initially, but it gives us more flexibility and portability now and in the future.
Let’s summarize why we prefer SwiftUI over UIKit:
- Support of fresh industry features. Historically, Apple prefers to push its new technologies using the new APIs so that all new features will be released in SwiftUI only.
- Cross-platform. Creating a native experience on so many different screen sizes is a pain point, plus there is no way that a single code can be used to target iOS, iPadOS, and watchOS. SwiftUI is trying to bridge this gap by creating a framework layer to manage the platform-level customization of the views. This is especially important for us as the Apple Watch is a significant platform for us.
- Easy to use. SwiftUI presents a simplified way to build UI and can also be understandable for designers — this means potentially fewer efforts in the future for engineers.
- Previewing. We can see real-time UI adjustments without waiting for compilation.
- SwiftUI is going to be the future of iOS app development for sure.
However, we should keep in mind:
- It’s impossible to connect to the existing UIKit code as SwiftUI uses a declarative way vs. imperative in UIKit. For this it’s important to remember to use View Models (in an MVVM or similar pattern) to connect the two.
- Sometimes simple things need more effort than using UIKit. In some cases (like drag and drop) it is simplest to embed your SwiftUI view inside of UIKit. As the framework evolves these cases will hopefully occur less often.
- Be ready for issues if you support older versions of the system.
- It’s not easy to control navigation logic between UIKit and SwiftUI. We use a presenter model (that will be covered in a future blog post!).
4 Comments
Sure is a very nice UI, if it worked as advertised.
In my case, when I use the slider to swim further, and then use it again to go back to the same distance, the duration and energy used will invariably be different from the initial state. That‘s not very confidence inspiring.
Hi Chris, If you’d like to reset the workout to its original form, tap the three dots in the top right corner of the workout screen and tap Reset to Original, and it should go back to the original numbers for you!
Perhaps – but it‘s counter-intuitive why the same result should not be achieved by just taking the slider back. Why is that?
We can look into why you’re experiencing this issue! Send a few screenshots of your account to support@myswimpro.com and our Support team can take a look for you.